Kmart Photos website accepts JPG, PNG, and HEIC file types for uploading.
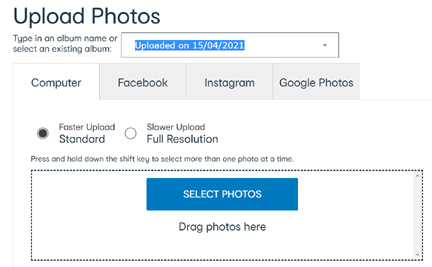
When uploading photos, you will be offered 2 options Standard & Full Resolution. Standard is the default option. This will upload photo faster and is best option for making simple prints and smaller sized products. Full resolution uploads slower but will capture the full resolution of the file sent. It’s suggested to use full resolution when creating poster or canvas products.
For prints, click on the Edit button under the photo and then choose Color Effect. In the selection box, change Full Color to Black and White or Sepia. The preview will update. To keep the edits, select Done. To discard the edits, tap the Revert button above the photo. For other products, the color effects can be changed in the product workflow by selecting Photo Edits.
The shopping cart is showing a thumbnail of the photos, not the rendered product. If you didn’t receive a Low-Resolution warning, the photos should be printed at the optimal resolution for the product chosen.
Yes, please come into your nearest store. All in-store kiosks have the option of transferring images from your phone and having them stored on a USB storage device.
Desktop View:
Select an album on the left under the photos tab, then simply select an image on the left and it will populate the image hole on the right and if there are multiple image holes, you can keep selecting images and it will automatically place the images into the image holes from left to right, top to bottom.
Or
Select an album on the left under the photos tab, then simply select an image and drag to the image hole on the product.
Mobile View – drag functionality is not available.
You need to select the Photos button, select an Album, then select an image.
Or
You can also select the image hole in the template, it will open the Photos automatically, you will then just need to select an Album and then an image.
For Desktop:
- Login
- Click on the person icon and select My Albums.
- On the left, under Filter by Album, select a year.
- Locate the album you wish to delete and click on the vertical dots under.
- From the context menu, select Delete Album.
- Click Ok on the prompt to confirm delete.
For smaller screens such as phone or tablet:
- Login
- Click on the 3 bars in the top left corner and select My Albums.
- Select Sort & Filter
- On the left, under Filter by Album, select a year.
- Locate the album you wish to delete and click on the vertical dots under.
- From the context menu, select Delete Album.
- Click Ok on the prompt to confirm delete.
Yes. Select Edit Photo and choose Best Fit - No Crop for the crop orientation.
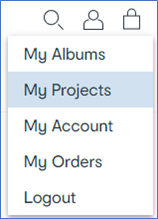
My Projects is your dedicated space where you can save your creation to later edit or reorder. Projects can be shared with friends for editing and purchasing. You must be logged-in to save, edit or share your projects.
Yes, you can create and save projects. Projects are saved in the “My Projects” area that can be accessed on the main page. If you need further help, please use our Contact Us webform.
To complete and order a Saved Project, Log In to your account and navigate to My Projects:
- Select the Project and click on Pencil Icon underneath it to edit it.
- In the top right corner select Review, then Add to Bag.
- Note: For mobile or smaller screens, Review is located at the bottom right.
- From there you can further edit the Project or Proceed to Checkout
- Ensure you check the Delivery Method is correct, click Proceed to Checkout
- Add in your Payment Information and click Place Order.
Yes, you can reprint and edit a project from my order history or My Projects by following these steps:
- Login with the account used to place the order.
- Select My Orders.
- Find your order and select Order Details.
- Locate the item you want to reorder and select it.
- The item is then added to a new bag.
- Select edit if you wish to change anything or Checkout.
My Projects
- Login with the account used to place the order.
- Select My Projects.
- Select Purchased Projects.
- Locate the item you want to reorder and click on edit icon.
- Review and Add to Bag.
- Click on Checkout.
If your projects are missing from your account do the following.
1) Make sure your logged into your account
2) If logged in, Logout of your account and log back in.
Projects are retained for 12 months from the last time an account holder logs in. If you have not logged into your account for over 12 months, then all projects have been removed.
Still having an issue please use the Contact Us webform here
All projects & images on your account will be available for 12 months from your last log in.
NOTE: there is no photobook workflow for mobile
Yes, you can add multiple pages when in the workflow you can add pages in multiples of 2 down in the bottom middle corner of the “Design Pages” screen.
Next Day Photobooks
4x6 (20 pages only)
Double-sided Photo Books - 6x8" (15x20cm), 8x8" (20x20cm), 8x12" (20x30cm) – 20 to 40 pages
Deliver to Home or Store Photobooks
Premium Hardcover Photo Books - 6x8", 8x8", 8x12", 12x8", 12x12" – 20 to 100 pages
We have a simple image calendar design that can be used which has one photo per page, also there are layouts that can be selected for the months so you can do one photo or more based on the layout you choose. You can also modify the elements to add and remove items. There is also clipart and backgrounds that can be added.
Yes, on the calendar design page you can choose this for the Desktop, Wall, and One-sided calendars only, not the print or poster calendars.